File Cabinet Manager
Overview | Manage Directories | Manage Files
Overview
The File Cabinet Manager allows you to manage your Web site storage space. The space is organized into directories (also called "folders" in this user guide). The directories may contain subdirectories and/or files. The files may include ones generated by our system during "Publish" (such as files required by your Splash page, and any pages that you create via the Website Editor), plus any files that you upload.
You may use the File Cabinet Manager to perform these actions:
| Directory Actions | File Actions |
|
|
|
From the Administration home page, click on the blue text of your sitename. Click on the secondary navigation menu link "Tool Box". Click on the link "File Cabinet Manager". The File Cabinet Manager window will open:
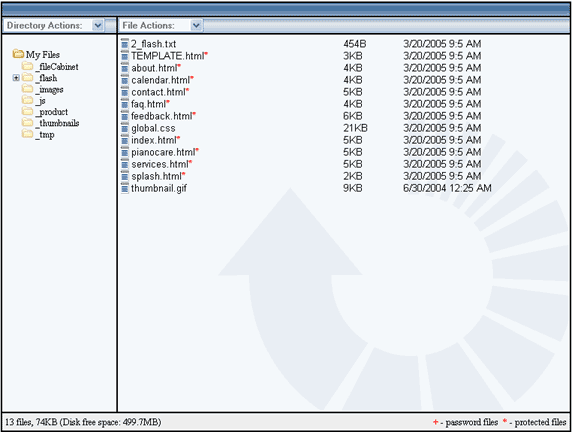
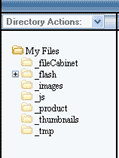
The left side of the File Cabinet Manager window is for managing your site's directories:
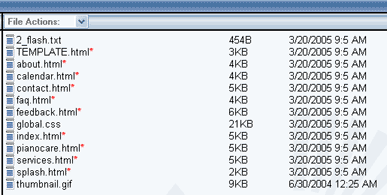
..while the right side of the File Cabinet Manager is for managing the files in the currently selected directory.
The top of the File Cabinet Manager indicates which directory is selected currently (a "/" means that the site's root directory is selected) and displays the status of the current action being performed, if any. It also includes the menus for managing directories and files.

The top-left section of the File Cabinet Manager has tools for directories..
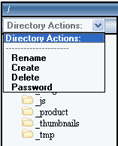
and the top-right section has tools for files.

The bottom section of the File Cabinet Manager informs you of the disk usage and available storage space. Footnotes note the symbols used to indicate if a file has been assigned a password (protecting it from being viewed by site visitors) and/or protected because it is system made (limiting the File Cabinet Manager actions that you may perform on it).

Back to the Top of the Page
Your Web site's files are organized into directories (also called "folders" in this user guide). Any directory whose name begins with an underscore ("_") is protected by the File Cabinet Manager. Such directories cannot be deleted or renamed. The current directory you are in is displayed by the File Cabinet Manager with highlighted text. Directory Actions affect the currently selected folder. When you load the File Cabinet Manager, the root directory ("My Files" folder) is selected by default. When a protected folder is selected, the "Rename" and "Delete" Directory Actions are grayed out (unavailable for selection).
Create Directory
To create a directory, click on the name of the folder that will be its "parent". Your new directory will become a "subfolder" of the directory that is selected when you choose "Create". In this example, we will create a subfolder of the "_images" directory. First, we select the "_images" directory by clicking its name:
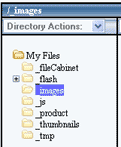
Next, click the "Directory Action" menu. The menu will expand. Move your mouse to the action you wish to perform and then click to select it. In this example, click "Create":
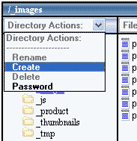
When the File Cabinet Manager asks for the directory name, enter in the name you want for your directory. Please keep in mind that only letters, numbers, underscores, and hyphens are allowed in directory names. Only system-created directory names may begin with an underscore. When you have typed your new directory's name, click on the button "OK" to add the directory.

Rename Directory
To rename a directory, click on the name of the directory to select it, and then click on "Rename" in the Directory Action menu. Or doubleclick rapidly on the directory name. In this example, we will rename the "animations" subfolder:
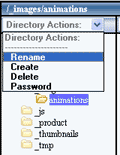
The selected directory's name will change to a textbox containing the directory name as text that you can edit. Change the text inside the box as desired, and then click outside the textbox to indicate that you are ready to set the new directory name, or press the "enter" key on your keyboard.

A prompt will appear asking if you wish to rename the directory. Review the new directory name displayed in the prompt. If you have typed the new directory name as you intended, then click the "OK" button. The directory will be renamed, and the directory list will refresh automatically showing its new name.

Delete Directory
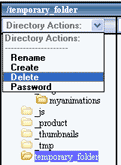
To delete a directory, click on the name of the directory that you would like to delete, and then select "Delete" from the Directory Action menu.

Password Protect a Directory
Any directory of your Web site may be assigned a password, protecting the files in the directory from being viewed by visitors to your site unless they enter the correct login information. You may add and delete users, change user passwords, and remove password protection entirely, at any time. Be sure to publish your Web site whenever you have updated your site's password protection settings.
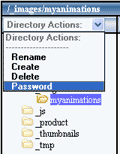
To assign a password to a directory, click on the name of the directory to select it, and then click on "Password" in the Directory Action menu. In this example, we will password protect the "myanimations" subfolder:
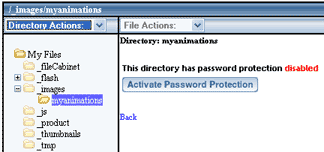
By default, password protection is disabled for your site's directories. If the current directory is not yet using password protection, click the "Activate Password Protection" button to enable password protection.
The password protection requires username(s) that visitors can use to log in to view the protected directory's files. You may add an unlimited number of users per protected directory. To add a user, click the "Add" button. Type a password for the user, and click the "Add User" button to finish.
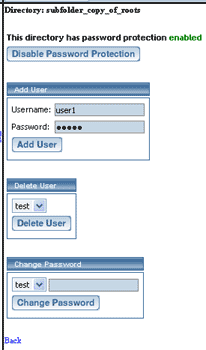
The protected directory's users appear in dropdown menus which allow you to change their passwords and to delete users. Remember to publish your changes via the Sync Website File Action when you have finished updating password protection.
To turn off a directory's password protection, click the "Disable Password Protection" button and publish your site via the "Sync Website" File Action. Visitors will be able to view the directory's files without logging in.
Back to the Top of the Page
When you select a directory, its files appear in a list on the right side of the File Cabinet Manager window. Any files with a "*" at the end of the filename are protected by the File Cabinet Manager. Such files cannot be deleted, renamed, or moved. Any files with a "+" at the end of the filename have been assigned password protection. Visitors cannot view these files unless they enter the correct user/password information.
Click on a filename in the list to select it. If you click once on the filename, the file will be selected. If you click on the filename again, the file will be unselected. You may select more than one file. Simply click on each filename in turn. To select all of the files at once, choose "Select All" from the File Actions menu. To clear all file selections, choose "Select None" from the File Actions menu.
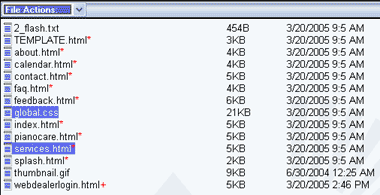
View File
To view a file, first unselect all other files. The "View" option is not available if more than one file is selected. Then click on the filename of the file you wish to view. Next, choose "View" from the File Actions menu.
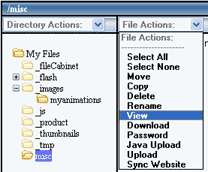
A new window will be opened by the File Cabinet Manager to display the file. Note that your browser may not be able to display all types of files in your site. For example, you need Adobe Acrobat Reader in order to view ".pdf" files.
Click the "X" in the top right corner of the view window to close it.
Copy File
To copy a file from one directory of your Web site to another, first select the directory in which the file is located. Next, click the file's name to select it. Then choose "Copy" from the File Actions menu. You can select multiple files by clicking on them one after another. Or copy all files in a directory by choosing "Select All" from the File Actions menu, and then choosing "Copy".
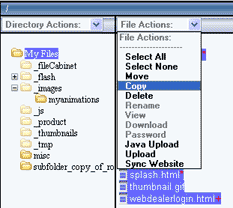
The File Cabinet Manager will display a list of your Web site's directories. Move your mouse to the name of the directory that will be the copied files' location. The directory name will change color. Click the name.
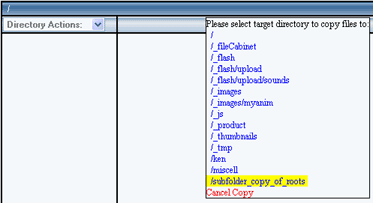
A prompt will appear asking you to confirm the copy. Click the "OK" button to copy the files, or click the "Cancel" button to exit the Copy action without copying any files.

If you clicked the "OK" button, copying will begin. A "copying files" message will appear in the upper center of the File Cabinet Manager. As soon as copying is done, the manager will return automatically to the original directory's file list.
Delete File
To delete a file, select the directory in which the file is located, click on the file's name in the directory's file list, and then choose "Delete" from the File Actions menu. You may select more than one file to be deleted.
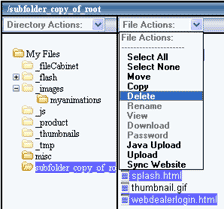
When the File Cabinet Manager asks you to confirm the deletion of the selected file(s), click on the "OK" button if you wish to continue. Deleting a file is irreversible and any files deleted in this manner cannot be restored. If you are in any doubt about deleting the selected file, click the "Cancel" button.

Rename File
To rename a file, select the directory in which the file is located, click on its name in the directory's file list, and then choose "Rename" from the File Actions menu. Or doubleclick rapidly on the filename. Only one file may be renamed at a time. Remember that file names may only include letters, numbers, underscores, and hyphens.
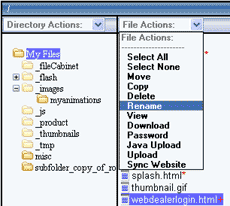
The selected file's name will change to a textbox containing the filename as text that you can edit. Change the text inside the box as desired, and then click outside the textbox to indicate that you are ready to set the new filename, or press the "enter" key on your keyboard. Check your typing carefully. The file will be renamed immediately. You will not be prompted to confirm the new name.

Move File
To move files, select the directory in which the files are located, then click on the filename(s) that you would like to move, and choose the "Move" option from the File Actions menu. You may move more than one file at a time. Protected (system created) files cannot be moved. If the "Move" option is not available, unselect any system files that you had selected, or choose "Copy" instead.
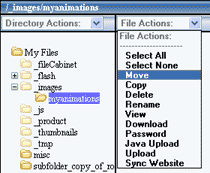
The File Cabinet Manager will display a list of your Web site's directories. Move your mouse to the name of the directory that will be the files' new location. The directory name will change color. Click the name.
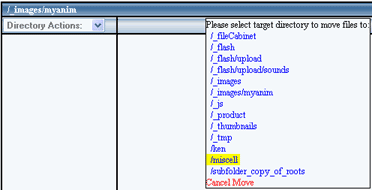
A prompt will appear asking you to confirm the move. Click the "OK" button to move the files, or click the "Cancel" button to exit the Move action without moving any files.

If you clicked "OK", moving will begin. A "moving files" message will appear in the upper center of the File Cabinet Manager. As soon as moving is done, the manager will return automatically to the original directory's file list. Notice that the moved files are no longer listed in the original directory. To manage them, select the directory to which they were moved.
Note: You cannot move files to the same directory in which they are located. If you choose the same directory by mistake, an error message will appear.
Download File
The File Cabinet Manager provides a non-Java way to download a single file from your Web site to your computer. (Use the File Cabinet Manager (Java) tool instead, if your computer can run Java applications. The Java version of the File Cabinet Manager allows multiple files, even entire folders, to be uploaded and downloaded.)
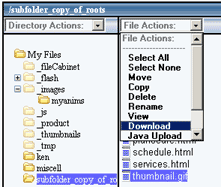
To download a file from your Web site to your computer, select the directory in which the file is located, click on the file's name in the directory's file list, and then choose "Download" from the File Actions menu.
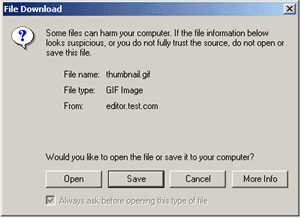
Your browser will display a window asking if you wish to open the file or to save it. The actual window may differ from the example below, depending upon the type of computer system you are using. Which option to select depends upon your needs. For example, if your computer does not yet have the software needed to open that type of file, then click the "Save" button to save the file to your computer without opening it.
Password Protect File
The File Cabinet Manager allows you to protect individual files from being viewed by visitors to your site, by assigning them password protection. Each file may have its own set of users and passwords which authorized visitors may use to view the file. You may password protect system files as well as files that you have created. You do not need to password protect the entire folder; as a result, the same directory can contain files viewable by any visitor and files that only certain visitors may view.
To password protect a file, select the directory that it is in, click on its filename in that folder, and the choose "Password" from the File Actions menu.
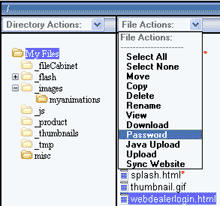
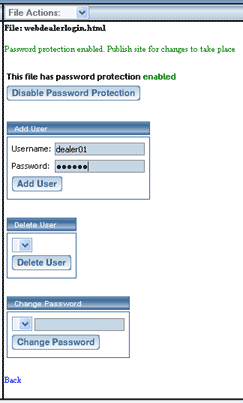
By default, the files in your Web site are not password protected. Your first step is to activate password protection for the selected file.
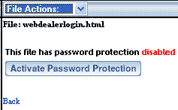
The right side of the File Cabinet Manager will update to display options for adding users and their passwords, to change the passwords of existing users, and to delete users. You may turn off the file's password protection entirely by clicking the "Disable Password Protection" button. When you have finished updating the file's password protection, click the "Back" link to view the current directory's file list.
Remember to perform the Sync Website File Action after changing password protection settings.
Upload File Using Java
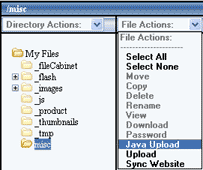
The File Cabinet Manager provides a Java-based upload option for customers whose computer systems can run Java applications. To upload files using Java, select the directory into which you wish to upload the files, and then choose "Java Upload" from the File Actions menu.
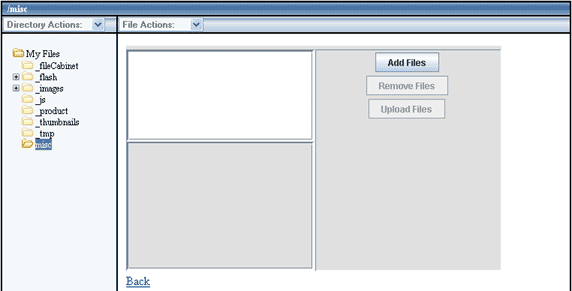
Upload options will appear in the right part of the File Cabinet Manager window. Click the "Add" button to begin.
A new window will open with options for browsing and selecting files on your computer. It may take some time for the window to open, depending upon the speed of your Internet connection and your computer's capacity. The status message, "Java Upload is loading", will appear while the new window opens. This message will disappear automatically after 30 seconds.

If the window finishes loading while this message is still displayed, you may begin using the new window's options without waiting for the message to disappear. To make the window load faster, uncheck the checkbox marked "Preview" by clicking on it.
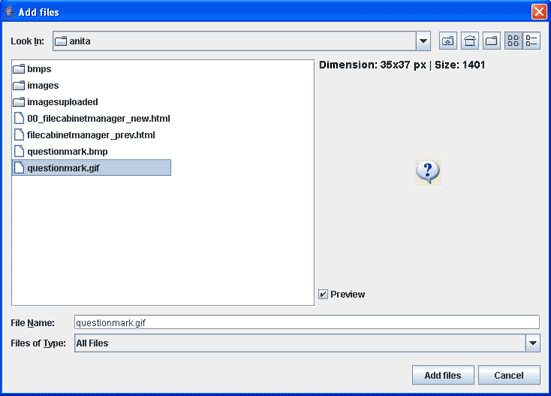
Use the icons in the upper right part of the window to navigate your computer's folders.
| Up one level | |
| Go to Desktop | |
| Create Folder | |
| Change the display from icons to list and back |
Doubleclick on folder names to list their contents. Click once on filenames to select them for upload. The files that you select will be added to the "File Name" box, separated by semicolons.
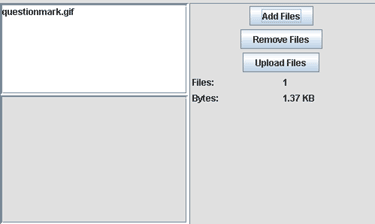
When you have selected all the files that you wish to upload, click the "Add" button. The browse window will close, and the File Cabinet Manager window will refresh, listing the files that you selected from your computer. Use "Add Files" and "Remove Files" to adjust the list as desired. Click the "Upload Files" button to upload the listed files. A message will appear when the upload has finished. The time required depends upon the speed of your Internet connection and the number and size of files to be uploaded. Click the "Back" link to switch the right side of the File Cabinet Manager from the upload options to the current directory's file list.
Upload File Without Using Java
The File Cabinet Manager provides a non-Java upload option for customers whose computer systems cannot run Java applications. To upload files without using Java, select the directory into which you wish to upload the files, and then choose "Upload" from the File Actions menu.
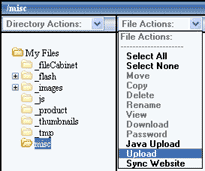
Upload options will appear in the right side of the File Cabinet Manager. It may take some time for them to appear, depending upon the speed of your Internet connection and your computer's capacity. The status message, "Upload tool is loading", will be displayed for 30 seconds, so that you know our system is loading the tool. (If the options load more quickly than that on your computer, you may begin using the upload tool. You don't have to wait for the message to disappear.)

Once the options appear, change "Number of Files to Upload" to the number of files that you wish to upload into the current directory. Then click on the "Continue" button.
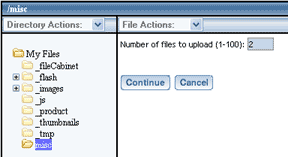
A series of textboxes and "Browse" buttons will appear, equal to the number you entered in the previous step. You may identify each upload file's name and path by typing that information into the textbox. Or use the "Browse" button. "Browse" opens your computer's standard file location window. Click your way to the desired file, then click the browse window's "Open" button. The file's name and location on your computer will be entered automatically into the upload textbox.
Repeat these steps for each file that you wish to upload. When you have entered all the upload information that you need, click the "Upload Files" button. The selected files will upload from your computer into the current directory in your Web site. Any empty textboxes will be ignored. The time required to upload the files depends upon the speed of your Internet connection and the size and number of files you are uploading.

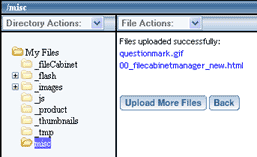
When the upload is done, a message will appear confirming the upload and listing the names of the files that uploaded successfully. You may click the "Back" button to switch from the current directory's upload options to its file list, or click the "Upload More Files" to upload additional files.
Sync Website
To synchronize your Web site's files so that visitors will see the files that you renamed, uploaded, etc., you may either publish your entire site, or use the File Cabinet Manager's Sync Website option. Publish updates your viewed site with any changes made to your product catalog, editor pages, and files. "Sync Website" publishes only the file changes. Thus it is much faster and more efficient than publishing your site, and should be used when your catalog and editor pages have not been modified.
To synchronize your site's files, choose "Sync Website" from the File Actions menu. It doesn't matter which directory is selected; all files will be synchronized.

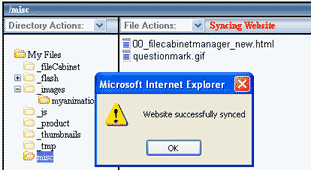
A message will pop up when all files have been synchronized. Click the "OK" button to close the pop-up window.
