Working with Forms
Detailed Explanation
Overview | Set up the Form Processor | Modify the Form Input Components | Designate the Form Processor for the Form ComponentOverview
Forms on your website can gather the information that a visitor submits to you and automatically populate the Contact Manager if the visitor decides to be added to your "e-mail list".
It is always best to confirm with a customer before adding them to the mail list. The confirmation with a Web site visitor is to prevent them from accusing you of unsolicted bulk e-mail (spam). Please be advised that the Contact Manager must NOT be used to send spam or for any other unethical marketing practice. Such usage will result in termination of services without notice, as per the Terms of Service.
Whether you have an existing form or will create a new form, you will need to:
- Step 1: have or create a form processor using the Form Processor Manager
- Step 2: modify or create your form input components with special field names
- Step 3: designate the form processor for the form component
Back to the Top of the Page
Step 1 - Set up the Form Processor
From the Administration home page, click on the blue text of your sitename. In the secondary navigation menu, click on "Tools". Click on "Form Processor Manager". If you don't already have a form processor to handle the forms on your website, enter in a name for your form processor (only letters, numbers, and spaces are valid characters) and click on the button "Create Form".
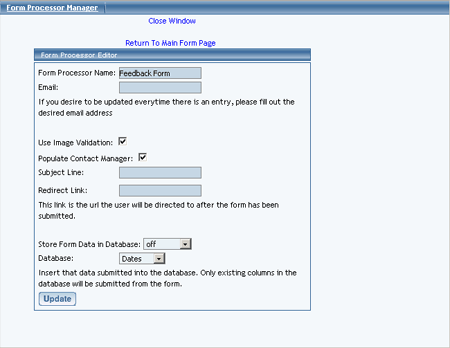
Once a form processor has been created, click on the blue text "Edit" for the form processor to modify the settings. You will see the following screen:

Specify your settings for the e-mail address that the form processor will send the form to and the subject that will be sent to you as the e-mail. If you want to specify where the Web site will take a visitor once the form has been submitted, specify the URL of a Web site or a Web page in the field "Redirect Link". Click on the square to the right of the text "Populate Contact Manager" so that the form processor will submit the contents of the form to the Contact Manager. When done entering in your information, click on the button "Update" to save your changes to the form processor. You will need to Publish the Web site in order to apply your changes to the Web site.
Back to the Top of the Page
Step 2 - Modify the Form Input Components
Whether you have to create your form input components for the form component or whether the fields already exist for a form component, the Field Names of the form input components must match what the system is looking for. If the Field Names do not match, the information from the form will not be sent to the Contact Manager. Please be advised that the Feedback Form created by default already has the correct Field Names, but still needs to have a form processor specified.
Below is a table that explains what the Field Names must be:
| Information | Field Name | Type |
|---|---|---|
| Add Me to your E-mail List? | addemail | checkbox |
| First Name | firstName | textbox |
| Last Name | lastName | textbox |
| Company Name | companyname | textbox |
| E-mail Address | textbox | |
| Street Address | address | textbox |
| Second Address | address2 | textbox |
| City | city | textbox |
| State | state | textbox |
| Zip Code | zipCode | textbox |
| Country | country | textbox |
| Home Phone Number | homePhone | textbox |
| Work Phone Number | workPhone | textbox |
| Mobile Phone | mobilePhone | textbox |
| Alternate Phone | alternatePhone | textbox |
| Secondary E-mail Address | email2 | textbox |
| Notes | notes | textarea |
The column "Information" is the information that you want to gather from the Web site visitor. The column "Field Name" lists what the form input component's Field Name must be (the list is not case sensitive, so if you have a form input component called "firstname" or "FIRSTNAME", the contact manager will still accept the information correctly). The column "Type" details the form input type that the form input component must be.
The field "addemail" is required. The Contact Manager must also have either the field "firstName" or "email" in order to accept the information from the form (it is in your best interest to collect both information, as you will need to address the Web site visitor via the e-mail in any case). The checkbox for "addemail" must also be unchecked - so that a customer MUST choose to be added to your Contact Manager. All other listed fields are optional.
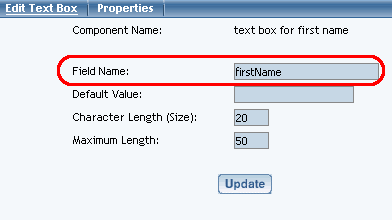
For a textbox component, the Field Name field is shown below:

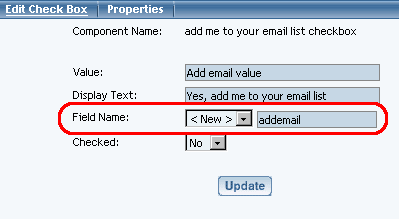
For a checkbox component, the Field Name field is shown below:

Back to the Top of the Page
Step 3 - Designate the Form Processor for the Form Component
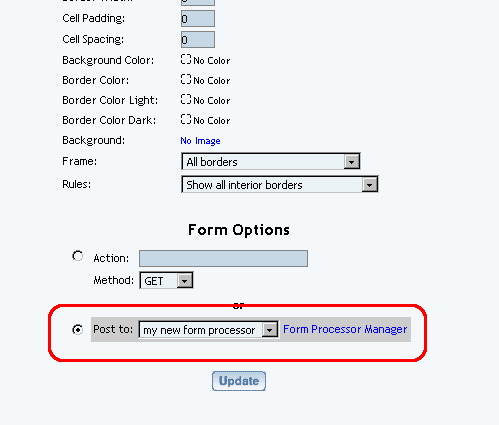
Edit the Form Component itself. Under the section "Form Options", designate the form processor you created in step 1.

Back to the Previous Page