Calendar Manager
Overview | Create Calendar | Calendar Properties | Jump to a Specific Date | How to Add an Event | Adding an Event | Editing an EventOverview
The calendar feature allows you to add one or more interactive calendars to your site. Here are just a few possible applications:
- Online Bookings of concerts, plays, events
Online Team Sign-ups
Interactive Scheduling of Contractors
Class Enrollments
Create Calendar
To create a calendar from the Calendar Manager, go to the Administration home page. Click on the blue text of your sitename to go in to the Website Editor. Click on "Tool Box" in the secondary navigation menu. Click on "Calendar Manager".
When the Calendar Manager page first loads, you will see the following screen

Enter in a name for your new calendar, then click on the button "Create". You will see the following screen:

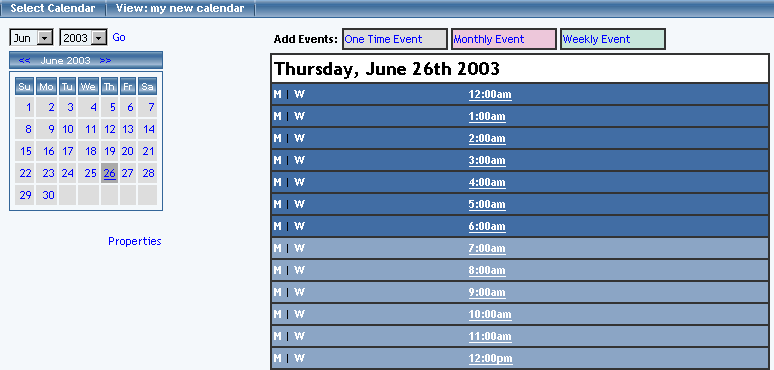
Choose your calendar in the drop-down menu to the right of the text "Calendar". Click on the button "Edit" to edit the calendar. Click on the button "Delete" to delete the calendar. When you edit the calendar, you will see the following screen:

Back to the Top of the Page
Calendar Properties
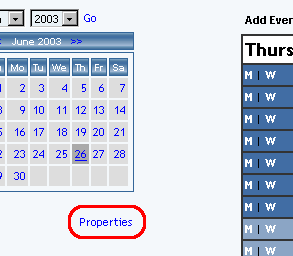
To get to the properties section of the calendar, open up the Calendar Manager. Select a calendar to edit, then click on the button "Edit". Below the small picture of the current month, click on the blue text "Properties".
The following screen will load:
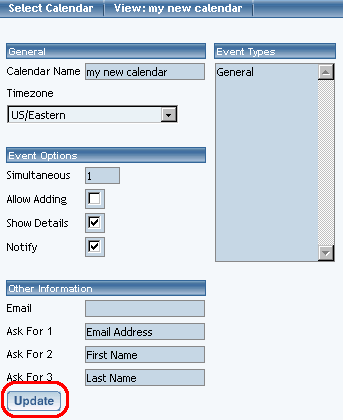
Calendar Name - If you want to change the name of the calendar, you would do so here. The name of the calendar is for your use only, to assist you in identifying which calendar is which.
Timezone - Setting this option will display that timezone for your calendar in the Calendar Manager. Those who visit the Web page that has the calendar will be able to define which timezone that they want the calendar to display as.
Simultaneous - Enter in the number of events that you want to allow to be scheduled for the same period of time. If you want the system to accept an unlimited number of events for a specific time frame, enter "0" (zero).
Allow Adding - If you want to allow Web site visitors to add events to the calendar, this option would be checked.
Show Details - If you have full-view enabled for the calendar component, you may check this option to display the event details in the full-view view of the calendar. If you do not have full-view enabled for the calendar component, you may check this option to display the event details only when a customer clicks on the event name.
Notify - If the Web site visitor is able to add an event to the calendar, the customer will be able to request an e-mail reminder to themselves if this option is checked. The e-mail will be sent from the e-mail address that is listed in the field "Email" text field.
Other Information
-
Email - This field specifies the e-mail address that will receive e-mail notification that an event has been added (as well as all the event details), assuming of course that "Allow Adding" has been enabled. This field also specifies the e-mail address that e-mail will be sent from if a Web site visitor requests an e-mail notification of an event, assuming of course that "Notify" has also been enabled.
Ask for 1 - By default, this field has been filled in with "Email Address". If you want customers to be notified (and you have "Notify" enabled) with a reminder that an event's scheduled time is arriving, this field must remain untouched in order for the system to inform the customer. If you do not want to inform customers of events at all, then you may remove this field or use different text. Whatever is in this field will appear when an event is added. When an event is added, a text field will allow a Web site visitor to input their own information. If something is filled out, it will be e-mailed to the e-mail address listed in the field "Email".
Ask for 2 - By default, this field has been filled in with "First Name". Whatever is in this field will appear when an event is added. When an event is added, a text field will allow a Web site visitor to input their own information. If something is filled out, it will be e-mailed to the e-mail address listed in the field "Email".
Ask for 3 - By default, this field has been filled in with "Last Name". Whatever is in this field will appear when an event is added. When an event is added, a text field will allow a Web site visitor to input their own information. If something is filled out, it will be e-mailed to the e-mail address listed in the field "Email".
When you are done specifying properties for the calendar, click on the button "Update" to save and apply your changes.
Back to the Top of the Page
Jump to a Specific Date
To jump to another month or year, select the month or year in the drop down menu, then click on the blue text "Go". The monthly calendar will reload with information on the selected month and year.
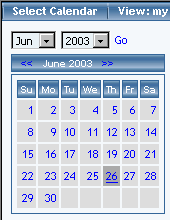
To manually move through month to month, click on the blue << to move to the previous month or the blue >> to move to the next month. After you click on the << or the >>, the monthly calendar will reload with information on the selected month.

If the system is already displaying the month in which you want to select, you may click on the day that you wish to work with.
The day that is underlined shows you the current day.
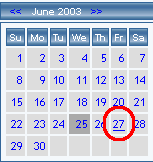
The day that has a dark grey background is the day that you are currently viewing.
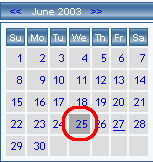
Once you click on a day, the daily schedule will load on the right side.
Back to the Top of the Page
How to Add an Event
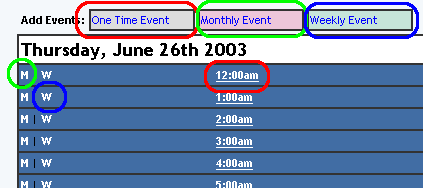
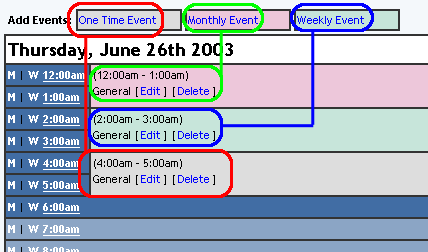
To add a one-time event, you may click on the blue text "One Time Event" above the daily schedule or you may click on the time that the event will start.
To add a weekly event, you may click on the blue text "Weekly Event" above the daily schedule or you may click on the "W" for the time that the event will start.
To add a monthly event, you may click on the blue text "Monthly Event" above the daily schedule or you may click on the "M" for the time that the event will start.
Back to the Top of the Page
Adding an Event
-
One Time Event
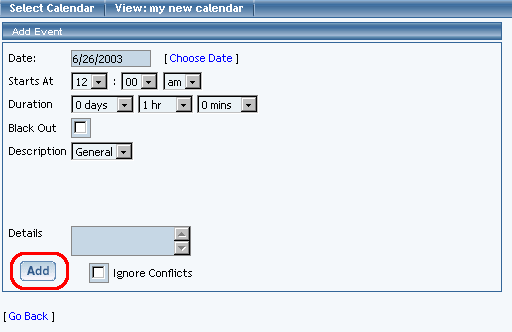
Date - The field shows you the currently selected date. To change the date, click on the blue text "Choose Date". A new window will appear that has the monthly shcedule on it to allow you to choose another day.
Starts At - Choose the time that event will begin at. This time will be using the timezone you specified under the calendar properties. Specify the hour, minutes, and the morning/night indicator (AM/PM) using the drop-down menus.
Duration - Specify how long the event will last by using the drop-down menus to specify the length in days, hours, and minutes.
Blackout - If this event is actually a blackout to prevent your Web site visitors from adding appointments, check mark this box. Of course, "Allow Adding" must be enabled under the calendar properties.
Description - Specify the event type for the event. This drop-down menu lists all of the event types that you specified in the calendar properties.
Details - Specify details for the event. These details may or may not show up on the Web site, depending on whether "Show Details" is enabled under calendar properties.
When done specifying your options, click on the button "Add" to add the event to your calendar.
Weekly Event
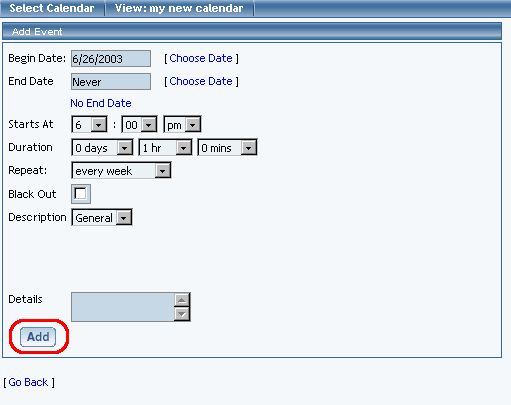
Begin Date - The field shows you the currently selected date that the event will start on. To change the date, click on the blue text "Choose Date". A new window will appear that has the monthly shcedule on it to allow you to choose another day.
End Date - The field shows you the current end date for the event. To change the date, click on the blue text "Choose Date". A new window will appear that has the monthly shcedule on it to allow you to choose another day. If you do not want to specify an end date for your event, click on the blue text "No End Date".
Starts At - Choose the time that event will begin at. This time will be using the timezone you specified under the calendar properties. Specify the hour, minutes, and the morning/night indicator (AM/PM) using the drop-down menus.
Duration - Specify how long the event will last by using the drop-down menus to specify the length in days, hours, and minutes.
Repeat - If you want the weekly event to repeat, select how often that event will repeat between the "Begin Date" and the "End Date". You choose to have the event repeat every week, every 2 weeks, every 3 weeks, every 4 weeks, every 5 weeks, every 6 weeks, every 7 weeks, every 8 weeks, every 9 weeks, or every 10 weeks.
Blackout - If this event is actually a blackout to prevent your Web site visitors from adding appointments, check mark this box. Of course, "Allow Adding" must be enabled under the calendar properties.
Description - Specify the event type for the event. This drop-down menu lists all of the event types that you specified in the calendar properties.
Details - Specify details for the event. These details may or may not show up on the Web site, depending on whether "Show Details" is enabled under calendar properties.
When done specifying your options, click on the button "Add" to add the event to your calendar.
Monthly Event
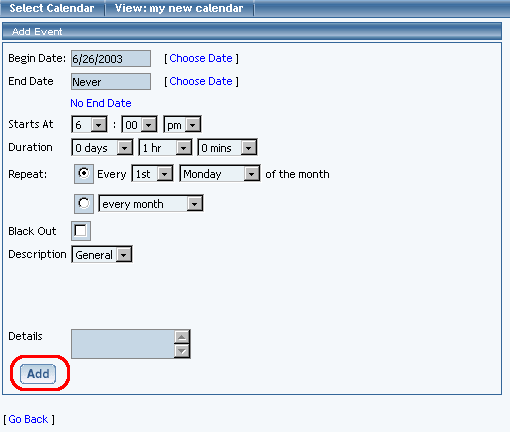
Begin Date - The field shows you the currently selected date that the event will start on. To change the date, click on the blue text "Choose Date". A new window will appear that has the monthly shcedule on it to allow you to choose another day.
End Date - The field shows you the current end date for the event. To change the date, click on the blue text "Choose Date". A new window will appear that has the monthly shcedule on it to allow you to choose another day. If you do not want to specify an end date for your event, click on the blue text "No End Date".
Starts At - Choose the time that event will begin at. This time will be using the timezone you specified under the calendar properties. Specify the hour, minutes, and the morning/night indicator (AM/PM) using the drop-down menus.
Duration - Specify how long the event will last by using the drop-down menus to specify the length in days, hours, and minutes.
Repeat - Specify the period in which the monthly event will repeat. If you want the monthly event to fall on a specific day of the week, select the first radio button and choose the occurence and the day of the week from the drop-down menu. If you want the monthly event to fall on the same date listed in "Begin Date", select the second radio button and choose the occurence from the drop-down menu.
Blackout - If this event is actually a blackout to prevent your Web site visitors from adding appointments, check mark this box. Of course, "Allow Adding" must be enabled under the calendar properties.
Description - Specify the event type for the event. This drop-down menu lists all of the event types that you specified in the calendar properties.
Details - Specify details for the event. These details may or may not show up on the Web site, depending on whether "Show Details" is enabled under calendar properties.
When done specifying your options, click on the button "Add" to add the event to your calendar.
Back to the Top of the Page
Editing an Event
The events in the daily schedule are color coded based on the event time - light gray for one-time events, pink for monthly events, and light green for weekly events.
If you hover your mouse pointer over the event type, you will see the event details in a small window section.
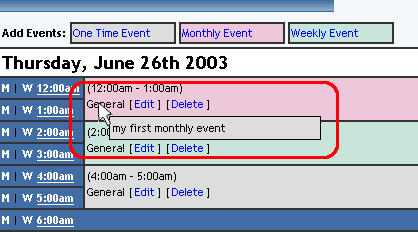
You may click on the blue text "Edit" to edit the event or the blue text "Delete" to delete the event.
When you edit an event, the window will be identical to the window when you added the event with the exception of the button "add" now replaced with the button "Update".
Back to the Previous Page