Standard Component
Rich Text (RTE)
Overview | Add/Edit Text | Formatting Text | Example of Completed RTERelated Links: How to Add a Component | How to Modify a Component | Properties | Editing Basics
Overview
The Rich Text component allows you to place text into your site's pages and format it for best effect. The formatting is previewed automatically as you apply it.
Add and Edit Rich Text
To add rich text to the page, you would need to add an RTE component. Here are the steps.
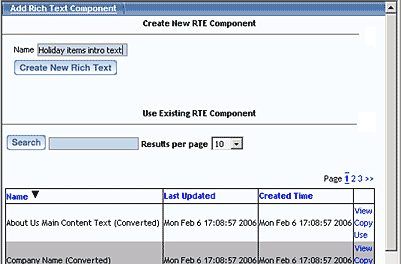
Click on "Page" in the top-left corner of the Page Editor. Click on "Standard". Click on "RTE". A window will open listing the RTE components already in your site. You may create a new RTE component or select an existing one via "Use" or "Copy". "View" lets you preview the existing RTE component to make sure you are copying or using the right one. The "Search" option lets you limit the list based on name of the component.
When you create or select the component, the window will switch to the RTE Editor window. In the section provided, enter in the text that you would like to display on the Web page. Edit existing text as you wish; any formatting applied to it will not be lost. HTML code will not be interpreted in this section, so the HTML code will actually appear on the Web page itself. If you want to use HTML code, you must use a Literal Component.
The text entered in to the text area will be displayed as formatted. You may type new text and then format it, or set the formatting first.
When typing in the RTE window, the text will be given the Paragraph Format, meaning that when you hit Enter/Return to move to the next line, there will be an empty line between your lines of text. You can avoid this by holding the Shift key while clicking Enter/Return.
The remainder of this tutorial is about how to format your text. 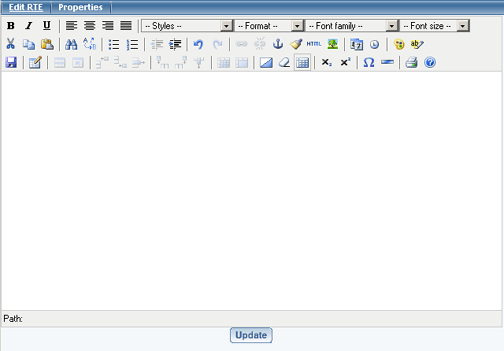
Back to Add/Edit Text
Back to the Top of the Page
Formatting Your Rich Text
As you enter text for your RTE Component, you may apply formatting to it. Or apply formatting later to selected text. The new format will be previewed right in the edit window. Change the text itself at any time; its formatting will not be lost unless you tell the editor to remove it.
To apply a format option, you click the appropriate icon. If you are unsure what an icon does, hover your mouse over it. A brief description will appear. Following is an example of the RTE editor control bar.
Click on an icon in this control bar to find out what it does:

Or if you know the kind of formatting that you wish to perform, click its link in the following list:
RTE component example
Back
- Be sure that you have permission to use images that you find on other Web sites. Read their conditions of use carefully. Most sites that allow free use of images limit that to personal sites; royalties must be paid or permission obtained if the site is commercial. You may use images located in our library royalty free as long as your site is hosted by us, whether your site is personal or commercial.
- Consider using an image component instead, if other parts of the site will need to use or copy the image without the text. Images added to RTE components can only be used on other pages by using the entire RTE.
- If you delete an image from your RTE component and then save your changes, the image is gone from the RTE permanently. In comparison, image components still exist in your site after being deleted from a page, making it easy to add them again.
- When you add a new table within your RTE, no other part of your site can use or copy the table (unless the entire RTE component is copied or used). If you want other pages to use the table but not the entire RTE, then consider using a table component instead, and add your RTE component to that container.
- To add a new table within a table cell, right-click in the desired cell, and choose "Insert a New Table".
- Tables in RTE components cannot include other components such as form input fields, catalog components, item components, etc. If you want your table to include such components, then use a form component instead.
- If you delete a table from your RTE component and then save your changes, the table is gone permanently. In comparison, table components still exist in your site after being deleted from a page, making it easy to add them again.
- If you would like to have percentage widths or heights in your tables, type the percentage in the appropriate field. For example, you can type “100” in the width field if you want a width of 100 pixels, or “100%” if you would like a width of 100 percent.
- When merging columns, click in the leftmost cell to merge.
- When merging rows, click in the topmost cell to merge.
Select Text to Format
To select the text to format, you highlight the text using the same mouse or keyboard techniques that you would use in a word processing program. For example, drag your mouse over a word or double click on it to select it. You may select as much or as little text as you want. You can even select a single letter and format it differently from the rest of the word.Back to Formatting
Set Font Type (Bold, Italic, Underline)

Two methods can be used to change the text type to bold, italic, or underlined. You may select the text and then click the "B", "I" or "U" icon to apply that font type. Or use your computer keyboard, just as you would in a word processing program. The keyboard shortcuts are ctrl-b for bold, ctrl-i for italic, and ctrl-u for underline. You may apply any combination of bold, underline and italics to your text.
Back to Formatting
Align text left, right, center, or justify

Use the alignment icons to align text to the left or right; to center the text; or to "justify" the text so that it aligns flush on both the left and right. Simply select the text that you wish to align, and then click the appropriate alignment icon. The editor will display the new alignment setting as it will appear on the published page (unless a stylesheet is assigned to override it).
Back to Formatting
Apply Your Own Class/Style to the Text

You may use your own styles instead of RTE format options. You do this by selecting the text to format and then selecting the desired class from the Styles menu. A class assigned this way will override RTE Editor format settings. To prevent this, select "No Class" from the Styles menu. For more information about creating your own styles and classes, please see Working with Classes and Stylesheets.
Back to Formatting
Apply Pre-Set Format to Text

The Format menu lets you format several aspects of your text in one easy step. Simply click on the Format menu and then click on the type of prebuilt format that you wish to use. "Paragraph" causes an extra blank line to be inserted automatically after the text. "Address" eliminates internal line breaks from the block of text that you are formatting, aligns it to the left, and italicizes it. "Preformatted" assumes that you will apply formatting to the text via other methods. Lines will not wrap when Preformatted is in effect, so you will have better results when you insert a table into the RTE component and then insert your text into the table cell before formatting it as "Preformatted". The Heading options insert line breaks before and after the text, make the text bold, and sets the font size according to the Heading option selected. (Heading 1 is the largest, and Heading 6 is the smallest.)
Back to Formatting
Assign a Font Face to Your Text

The font face can be assigned via the Font Family menu. It offers standard font names, ensuring that your page will display consistently no matter what type of computer systems your visitors use. To set the font face, click on the Font Family menu and then click on the family name (Arial, Tahoma, etc.) that you want. The RTE Editor will display the new settings as it will appear on the published page.
Back to Formatting
Set the Size of Your Text

You may assign the size of your text by selecting it from the Font Size menu. Click on the menu, and then click on the size that you want. The editor will display the new size setting as it will appear on the published page (unless a stylesheet is assigned that overrides this setting). Another way to set font size is the Format menu's "Heading" options, but those affect line breaks and font type as well as size. Use the Font size menu when the only aspect that you wish to change is font size.
Back to Formatting
Cut, Copy and Paste Text

The RTE Editor lets you use the cut, copy and paste techniques that you are accustomed to in other applications such as word processing programs. Select the text and then click the appropriate icon to cut or copy the text, or right-click on the text and select cut or copy from the menu that appears, or use a keyboard shortcut. The shortcut for cut is ctrl-x, and the shortcut for copy is ctrl-c. Insert the cut or copied text where desired by clicking where the text is to be pasted; then click the paste icon or right-click and select "Paste" from the menu that appears, or use the keyboard shortcut for paste (ctrl-v). The formatting of the cut or copied text is retained when you paste the text.
Back to Formatting
Find and Replace Text

Use the Search and Find/Replace icons to work with large RTE components. When you click these icons, a window will appear with a field in which you type the text that you wish to find, radio buttons to indicate the direction of the search (up towards the beginning of the component, or down towards the end of it), an option for matching case if desired, and (if you clicked the Find/Replace icon) a field for specifying what to replace the text with. Use the buttons provided to find the next occurrence of the text, to replace the current match, to replace all matches, or to cancel closing the find window without making any additional changes.
Back to Formatting
Bullet or Unbullet Text

RTE components allow you to create bulleted lists easily. Simply click the bullet icon and type your text; a new bullet will begin when you press the enter key to start a new line. Click the bullet icon again to turn off bulleting. For existing lines of text, select the text first and then click the bullet icon. Each click of the icon toggles the text between bulleted and unbulleted list format.
Back to Formatting
Number or Unnumber Your Lines of Text

RTE components allow you to create numbered lists easily. Simply click the numbered list icon and type your text; a new number will begin when you press the enter key to start a new line. Click the numbered list icon again to turn off this type of list format. For existing lines of text, select the text first and then click the numbered list icon. Each click of the icon toggles the text between numbered list format and normal lines of text.
Back to Formatting
Indent and Unindent Text

A block of text can be indented to the right, or unindented (shifted towards the left) via the indent and unindent icons. Each click of these icons shifts the selected text a set amount in the requested direction. The editor will display the new indentation as it will appear on the published page.
Back to Formatting
Undo and Redo Changes

Use the Undo and Redo icons to undo or redo changes. The Undo icon is the counterclockwise arrow pointing to the left, and the Redo icon is the clockwise arrow pointing to the right. Any changes that have not yet been saved can be undone, whether they are changes to formatting or to the text itself. The editor will display the changes as you undo or redo them.
Back to Formatting
Set and Remove Hyperlinks

Links can be assigned to text, and existing links can changed, via the Insert/Edit Link icon. Click that icon, and a window will open offering many powerful controls. Click the "General" tab for basic link options. If you are linking to a page located outside of your own site, be sure to begin the link URL with "http://". Click the "Popup" tab for options to open the link using Javascript options. Click the "Events" tab for options to change how the link is processed when the listed events are performed by the visitor. Only very advanced users should click the "Advanced" tab. Documentation of the options listed can be found by searching the Internet. Remember to click the "Insert" button to save your new link settings.
To remove a link, simply select the linked text and then click the Unlink icon.
Back to Formatting
Insert an Anchor (A Named Location)
You insert an "anchor" (also called "bookmark") so that other pages or sections of the page can link directly to that part of the page. You may have reached this help subtopic by clicking such a link. Each anchor name needs to occur only once on its page; otherwise, it will not work. When you create a link to the anchor, remember to begin the link with a pound sign ("#").
![]()
Back to Formatting
Clean up formatting (useful after making many changes)
As you change the formatting of text in your RTE component, invisible control codes accummulate. These can create clashes so that your text does not display as expected, and it will make the page a bit slower to load. Fix this by clicking the Cleanup Messy Code icon. Don't worry if nothing seems to happen. Cleanup improves the behind-the-scenes functioning of the component.
![]()
Back to Formatting
Edit the Underlying HTML Code (Advanced Use Only)
Advanced users can clean up messy formatting manually, by clicking the HTML icon. A window will appear displaying the underlying HTML code. Add or remove basic tags. Advanced tags such as MARQUEE will be discarded as will any HTML tags that contain errors. Click the "Update" button to confirm your HTML changes and close the HTML window. The editor will refresh based on your changes.
![]()
Back to Formatting
Insert and Edit Image
An image can be inserted into your rich text component by clicking the Add/Edit Image icon. A new window
will open. Click the "General" tab to identify the location of the image that you wish to use and to set the image's title and description. Click the linked text next to "Image" to bring up the Select Image window. Once you have selected your image, it will appear full-sized in the preview area of the General section. Scrollbars are provided to see the entire image, if it is larger than the preview area.
![]()
Click the "Appearance" tab to set the image's alignment, display dimensions, horizontal and vertical space (blank space around the image), and more. Note that the image preview that appears in the General section is full sized; it will not reflect the display height and width that you specify in the Appearance section.
Click the "Advanced" tab to set a "swap" image (also called mouseover or rollover). You need to enter the addresses of two images: the image that will appear when a visitor hovers the mouse over the original image's location (called "mouse over"), and the image that will appear when the visitor moves the mouse to another location on the page (called "mouse out"). Advanced users may wish to take advantage of the other Advanced settings such as using an image map. We cannot offer technical support for how to create image maps. Note simply that you would put the image map code into a literal component on the same page on which the RTE is located. Then in the Advanced section of the RTE image, enter the name that you assigned to your image map.
The initial Insert Image window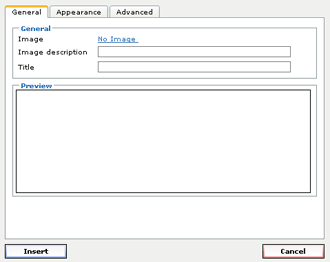 |
Selecting an image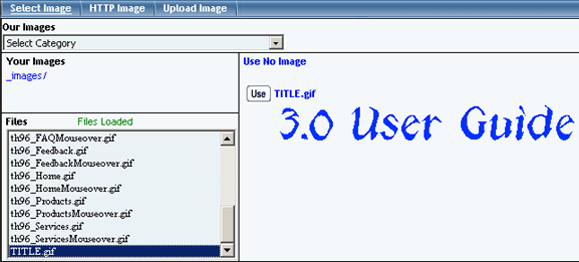 |
The image is previewed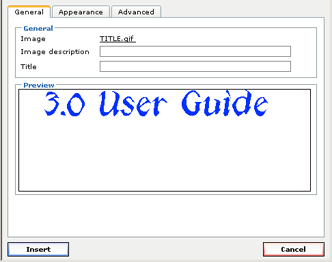 |
The image is now displayed in the editor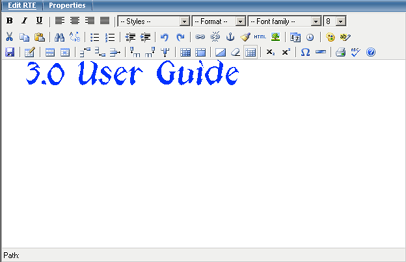 |
Important Notes:
Back to Formatting
Insert the Date and Time

It is a good idea to display the date that a page was updated. That lets your visitors know how current your information is, increasing their confidence in your site. And it will help you to track how quickly the search engines add your page and what version of the page they have cached. This can be very valuable as you work to promote your site effectively.
The easiest way to insert the date and time into a page is via the RTE component. Click the location in the RTE where the date or time is to appear. Then click the Date icon to insert the date, or the Time icon to insert the time. The inserted date or time will be normal editable text, once you insert it. No spaces or line breaks will be inserted before or after the date and time, so be sure to enter those manually.
Back to Formatting
Set the Text and Background Font Colors
You can change the color or your text and of the background against which it appears, via the color icons. The picture of a palette sets the text color, and the picture next to it containing the letters "ab" sets the background color. These colors are also used for horizontal lines, table border and background colors, and much more.
![]()
Set the color by clicking the Text Color or Background Color icon. A list of the site's palette colors will appear. Select a color from the list by clicking on the desired colored box, or scroll to the end of the list and click "Add Color" to use a color not yet in the list. Click here for more information about selecting colors.
Back to Formatting
Insert a New Table or Edit the Properties of the Current Table
You can insert tables into your RTE component as a way of organizing its content. Begin by clicking the New Table icon. A window will appear. Use its options to set the table's properties (border, cell padding, etc.). Then use the other table icons located on the same row of the editor, to fine tune your table. Add content to the table by clicking in the cell in which you want the content to appear. If your table doesn't have a border, you can turn on hidden guidelines to see where it is. To delete a table, select all of its content and click the keyboard delete key.
![]()
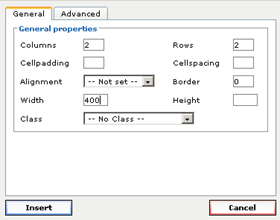 |
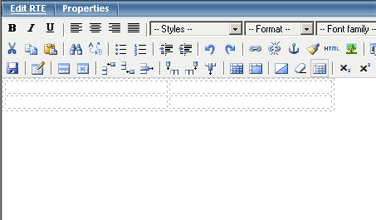 |
Important Notes:
Back to Formatting
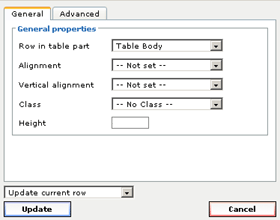
Edit the Current Row's Properties

You can edit a row's properties by clicking any cell in the row, and then clicking the Edit Row icon. A window will appear. Click the "General" tab to set the row's height (in pixels), its default alignment, etc. Click the "Advanced" tab to give the row a background image or background color. Only advanced users should use the other settings in this section.
 |
Back to Formatting
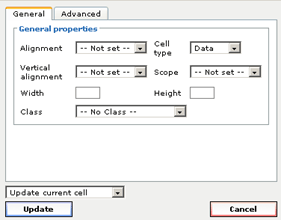
Edit the Current Cell's Properties

You can edit a cell's properties by clicking in the cell and then clicking the Edit Cell icon. A window will appear. Click the "General" tab to set the cell's height and width (in pixels), and to set its alignment overriding the defaults of the row and table that contain the cell. You can also assign a class to the cell. Click the "Advanced" tab to give the cell a background image or background color. Only advanced users should use the other settings in this section.
Notice the menu in the bottom left corner of the General section. Use it to apply the changes not only to the current cell but to others in the same row or all cells in the table, if desired.
 |
Back to Formatting
Add and Delete Table Rows

When you add a table, you specify how many columns and rows you want it to contain. You may add more rows later by clicking in a cell of the table, and then clicking one of the icons to add a new row. If you click the Insert Row Before icon, the new row will appear just above the cell that your cursor is in. If you click Insert row after, then the new row will appear just below the cell that your cursor is in. To remove a row from the table, click any cell in that row, and then click the Delete Row icon.
If you make a mistake, use the Undo icon to undo your changes until the table is back the way you had it.
Back to Formatting
Add and Delete Table Columns
When you add a table, you specify how many columns and rows you want it to contain. You may add more columns later by clicking in a cell of the table, and then clicking one of the icons to add a new column. If you click the Insert Column Before icon, the new column will appear just to the left of the cell that your cursor is in. If you click Insert Column After, then the new column will appear just to the right of the cell that your cursor is in. To remove a column from the table, click any cell in that column, and then click the Remove Column icon.
![]()
If you make a mistake, use the Undo icon to undo your changes until the table is back the way you had it.
Back to Formatting
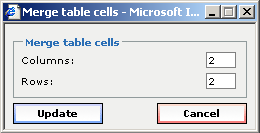
Merge Table Cells
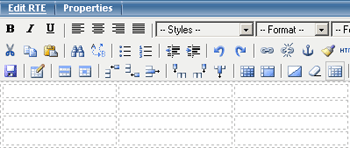
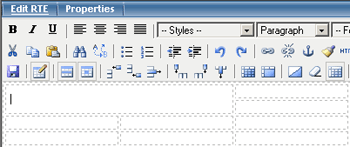
Normally, a table has the same number of cells in every row and column, like a chessboard. You can create a more interesting arrangement by merging some cells so that they span several rows or columns. Click in the starting cell and then click the Merge Cells icon. Enter the number of rows or columns to merge, including the starting cell. Click the update button. The window will close and the editor will display the table with the new cell arrangement. All content that had been in the individual cells will occupy the same cell now.
![]()
 |
 |
 |
Back to Formatting
Split Table Cells

The Split Table Cells icon is used to return merged cells to their original layout.Back to Formatting
Insert a Horizontal Line

You can insert a horizontal line by clicking the location in the RTE where you want the line to appear, and then clicking the Insert/Edit Horizontal Rule icon. The line will appear immediately. By default, it extends across the display area. Hover your mouse over the line until your cursor changes from the insertion mark ("I") to arrows, and then click on the line. Edit markers will appear allowing you to drag the line into the shape that you desire. Change the color of the line by selecting it and then clicking the Foreground Color icon.
Back to Formatting
Toggle Background

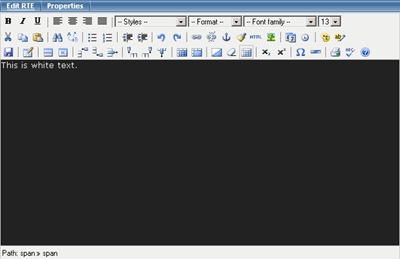
The Toggle Background icon will change the background of the Rich Text Editor to a very dark gray, allowing you to easily see light-colored text. You can set the background to white again by re-clicking the button.
Back to Formatting
Remove Formatting

Unlike old text components, rich text (RTE) components retain their formatting no matter how many changes you make. Sometimes, you will need to clear all formatting, so that you can start fresh to achieve the desired effect. In the rich text editor, you have to remove the formatting manually.
To remove formatting from text, select it and then click the Remove Formatting icon. All formatting will be removed; clicking the icon again will not put it back. Instead, use the Undo icon to put the formatting back if you clear it by mistake.
Back to Formatting
Show or Hide Controls Such as the Table Guidelines
The Guidelines icon is handy for displaying the edges of a table and its cells, if the table has no border. Click the icon once to display the guidelines, and then click it again to hide them. The guidelines will not appear on the published page.
![]()
Back to Formatting
Insert Subscripts and Superscripts
To turn text into subscripts or superscripts, use the Subscript and Superscript icons. Subscripts display slightly lower on a line than normal text. Superscripts appear slightly higher on the line. Proceed by clicking the subscript or superscript icon (depending upon the effect that you wish to achieve), and then type the text. Or type the text, select it, and then click the icon. Toggle back to normal text by clicking the icon again while the subscripted or superscripted text is selected.
![]()
Back to Formatting
Insert Special Characters
To insert special characters such as the copyright symbol into your rich text, click the Custom Character icon. A character map window will appear. Hover your mouse over the characters, and they will appear in a larger preview in the upper right section of the map window. Click on a character once to add it. You may continue clicking on characters to add them from the map. When finished, click the "X" at the top right of the map window to close it.
![]()
Back to Formatting
Print the text
The Print icon opens your browser's standard print dialog. Use it to print the contents of the RTE
component.
![]()
Back to Formatting
Check Your Spelling
Once you have entered your text, click the Spellcheck icon to check for errors. This option is
unavailable for Netscape and Mozilla users
![]()
Back to Formatting
Open the RTE Editor Help Window
While you are in the RTE editor, you can open its help window by clicking the Question Mark icon.
![]()
Back to Formatting
Save Your Changes
When you are all done formatting this rich text component, click on the Disk icon to save your new text and formatting to the Web page. You can also save by clicking the Update button at the bottom of the window. You will still need to Publish the Web page in order for visitors to see your changes.
![]()
Back to Formatting
Example of Completed RTE
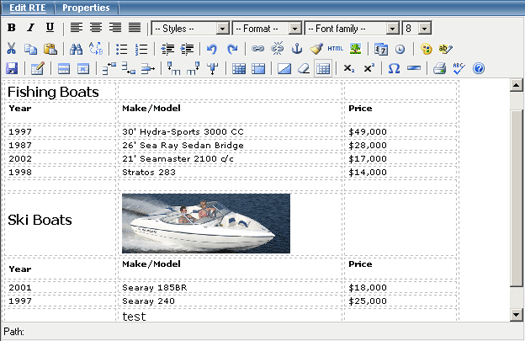
Here is an example of a completed rich text component (RTE) with its text and image arranged within a table. The table's border width is set to zero (no border). For convenience while editing, guidelines are turned on. They will not appear on the published page.
Editing Basics
Back